AI Agent Studio 101

In today’s article, we’re going to give a high-level overview of AI Agent Studio, which is ServiceNow’s user-friendly AI agent builder. We’ll start off with some basic definitions and then move into a step-by-step walkthrough of the page. We’ll also cover some gotchas!
Definitions
Here’s some basic terminology you’ll need to understand:
- AI agent: A prompt-driven worker that intends to solve a specific goal. An example of this could be a Change Risk Assessment Agent which ultimately fills out a change risk assessment.
- Agentic workflow: A prompt-driven collection of agents, orchestrated by an AI agent, that intends to solve a multi-step business process. An example of this could be a Change Management Workflow, whose AI orchestrator dispatches the Change Risk Assessment Agent, as well as other agents, in a particular sequence, to resolve change requests.
- Tool: An action called by an AI Agent to accomplish something on the server-side. An example of this could be a Record Lookup Tool, called by the Change Risk Assessment Agent, which gets the current context of the change record.
Building an agent
We’re not going to cover building an agentic workflow in this post because in order to build an agentic workflow, you first need agents. As you’ll see below, when building an agent, we provide a name, a description, a role, and a list of steps (and eventually tools, access controls, etc). Building an agentic workflow is very similar — except you’re just pulling in agents into the workflow rather than tools into the agent. You’ll still need some basic prompting and to detail when to dispatch the specific agents.
That aside — we’re assuming you’ve gone into AI Agent Studio, clicked the Create and manage tab, clicked on the AI agents sub-tab, and then clicked Add at this point.

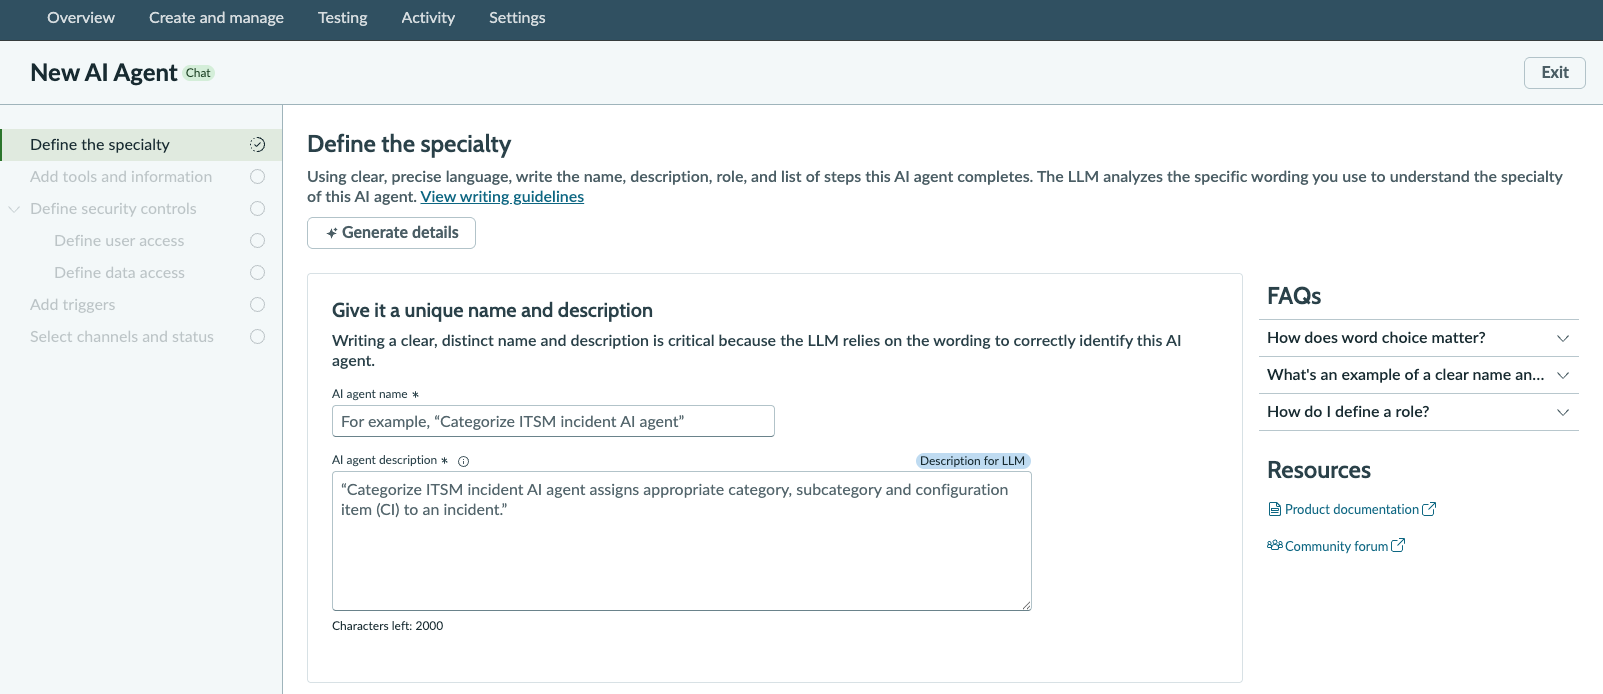
If you did that successfully… your screen will look something like this:
AI agent name
On this screen, you need to define an AI agent name. The name is important (as is every other field you will fill out, as you’ll see me continually emphasize over the course of this article). Make it concise and make it descriptive.
AI agent description
The AI agent description is also very important. This should be distinct yet descriptive. If you need to invoke this AI Agent from a Workflow eventually, the name and description are how the orchestrator knows which agent to invoke. Therefore, you shouldn’t just write something like “This agent analyzes data.”
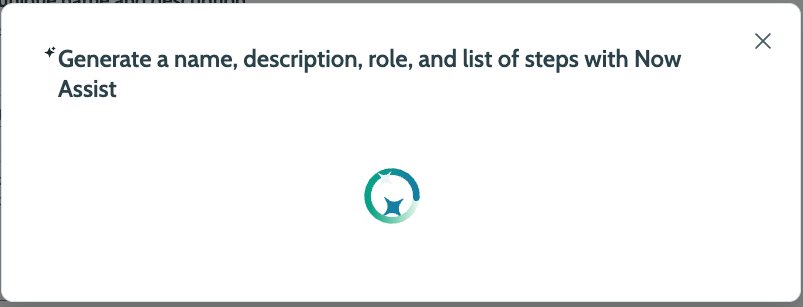
If you need help with writing these… you can rely on AI to support you. In the above screenshot, you can see a Generate details button, where you describe your goal at a high-level, and AI then fills out all of the fields for you. It’s magic!
AI agent role and list of steps
The AI agent role is a bit of a repeat of the AI agent description. Not necessarily a copy-paste job, but it’ll be similar, albeit more specific. This is where you define (at a high-level) exactly what the goal of this agent is. The example that ServiceNow provides in that little (i) info icon is this:
The universal request analyzer agent specializes in comprehensive ticket analysis, classification, and self-service opportunity identification. This agent ensures accurate initial assessment of requests by leveraging a knowledge base and historical data to either provide immediate self-service solutions or determine appropriate routing paths.
The List of steps is arguably the most important piece of this whole pie (alright, they’re all important, but this one is super duper important). In this box, you’ll define the textual process map for what the AI agent should do. Which step comes first, which step comes second, what if this happens, what if that happens.
I like to list these out as a numbered list. That’s also the official recommendation of ServiceNow. The beauty in this is you can handle “sub-processes” by doing something like a Step 1., a Step 1.1, and a Step 1.2..
In this List of steps, I like to explicitly define which Tool the LLM should invoke in certain steps. While the LLM should be able to know, based on the tool name and description (we’ll cover this soon), I prefer to make it as cut and dry as possible. For an example of a Change Risk Assessment Agent like I mentioned earlier, here’s an example of a List of steps:
- Retrieve the context of the Change Request record by calling the tool “Get Change Request Context.”
- Retrieve the Risk Assessment questions by calling the tool “Get Risk Assessment Questions.”
- Using the context provided in Step 1, and the list of questions in Step 2, provide your recommended answers to the questions back to the user for approval. If the user approves, proceed to step 4. Otherwise, proceed to step 3.1. 3.1. This step is only reached if the user did NOT approve in Step 3. Ask the user what they would change.
- Submit the Risk Assessment using the tool “Submit Risk Assessment”, passing through the Change Request Sys ID, the Risk Assessment Question Name, and Risk Assessment Question Answer.
Obviously this is not as fleshed out as it would be in reality. What I like to do is draw out my process map on paper, in a similar manner to above, and then have Claude help me fluff it up. I shouldn’t have to say this, but I then refine it again, manually. I don’t just rely on Claude completely…
In step 4, you can see that I explicitly detail which values to pass through: Change Request Sys ID, the Risk Assessment Question Name, and Risk Assessment Question Answer. These should match exactly the inputs received by the tool “Submit Risk Assessment” which we’ll build in the next step. If there is any ambiguity, this can lead to errors. For instance, if my tool expects “Risk Assessment Question Answer” and in my list of steps I specify “Question Choice”, this may cause an error. It’s not guaranteed to cause an error. But trust me, it’s caused me much headache, and that’s why I’m telling you this now: make sure to pass the exact same values in both places.
Adding tools and information
The next tab in the left-sidebar is for punching in tools. This is where the money is made. There’s a number of different types of tools you can select from:
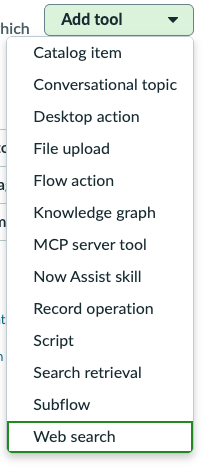
I have not used them all. I tend to favor flow actions and subflows. But that’s not to say there isn’t a ton of value in the others. A record operation, for example, is very popular. As its name implies, it can be used for to create, delete, look up, and update a record (or many records).
I prefer to use flow actions over scripts for debugability. Because flow actions are created in Flow Designer, you can see execution history, and have a bit more intel into how it’s operating, compared to scripts, which may fail silently.
Important note: Subflows and flow actions must be published for them to display in the dropdown lists.
When you select a tool from that dropdown, you’ll get a pop-up where you must fill out the name of the tool and its description. Depending on the tool type, you may see other fields (e.g. inputs). As mentioned earlier, it’s important that these input names match what you mentioned earlier in the List of steps. For this reason, don’t think of building an AI agent as a linear process — you must go back and refine your prompt to match your tools.
The pop-up looks something like this:
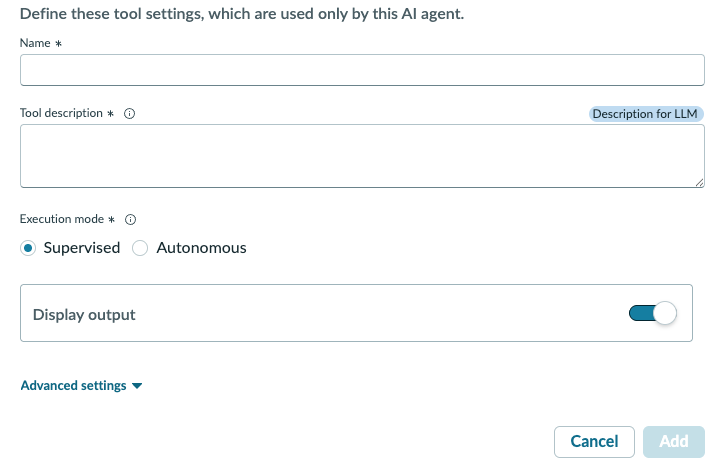
Again, it’s critical to define the name and tool description well here. The name HAS TO MATCH the name you told the LLM to call in the list of steps. Avoid ambiguity!
The tool description should outline what this tool does. Think of this as a single, isolated unit of work. The LLM calls this tool based off of its name and description. Therefore, it should not reference other tools — it shouldn’t say “this tool is called after OTHER tool has been called.” Leave the WHEN to the orchestrator.
I like to be very specific about what the tool should expect. An example of a tool description I might write is:
When passed the Change Request sys_id, this tool looks up the Change Request and returns the short description, description, backout plan, and implementation plan fields.
This helps the LLM understand exactly what’s happening.
The execution mode of supervised vs autonomous — this determines whether the agent asks before proceeding. If it’s supervised, it will request permission to execute the tool. If it’s autonomous, it will proceed automatically when the AI agent invokes it.
Display output is generally enabled for testing and disabled for production. The output is usually info that just administrators/testers need to see to validate the tools are working correctly. For example, if you had a flow action tool, and that tool returned a JSON array of records… if display output is true, that JSON array will be presented to the user in a message. Were the display output false, the array would not be displayed to the end-user.
The advanced settings allow you to customize the output format and also specify in-progress/completion messages for the LLM to display while it’s working through the tool.
You can also leverage the AI tool recommend existing tools to you on the Add tools and information page.
Define security controls
This is where you can lock this puppy down.
Define user access
This is where you determine the minimum permission needed to interact with the AI agent. You can set it to any authenticated user, a user with specific roles, or public (even non-logged in users).
Define data access
This is a little bit more important to consider. This determines what permissions the AI Agent has access to when executing the tools. Be cognizant of what access is required for a tool to work… for instance, if one of your tools looks up change requests, you need to ensure that your agent has read access on the change request table. If your AI agent does not have the permissions it needs, it will fail.
You can select from a list of AI users, which have pre-defined roles. You can also create your own AI user with specified roles in the User [sys_user] table.
Add triggers
You can set this puppy up to fire automatically, just like a flow would. (In fact, setting up a trigger literally creates a flow that then invokes this AI agent.)
One very important thing to call out here is the Define user identity of this trigger configuration.
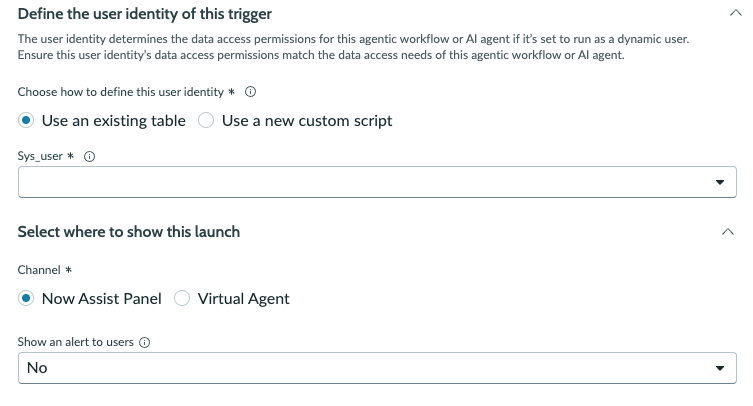
If you’re picturing your human interacting with the Now Assist Panel to converse with the agent or approve its decisions, pay attention to this paragraph. The user in the Sys_user field here is who can converse in NAP about the agent’s execution. This dropdown contains fields that reference sys_user on the specified table (you would’ve specified the table earlier in the configuration). Examples include assigned_to, requested_by, opened_by, etc. Basically, the user in that field is the user who can interact with NAP regarding the agent’s execution.
Therefore if you want the person assigned to the case to be the person interacting with NAP, don’t set this value to closed_by. It must be the person you expect to interact with the case.
The reason this is so important is because, as you can see, you can use a custom script and hard-code a sys_id (of the sys_user) that can interact with the record. If you do this, ONLY that user will be able to interact with NAP regarding the agent’s execution.
I’d recommend sticking with Now Assist Panel as the Channel in the next configuration line. I’d also recommend flipping that Show an alert to users to Yes — this will display a little info message on the record to tell the human that AI was working on the record.
Select channels and status
This is the last page of the setup. Here you can toggle whether users can invoke the agent from NAP or VA and you can also specify what the in-progress/completion message of the AI agent is (similar to how you could do it with the tools, you can do it at the agent level).
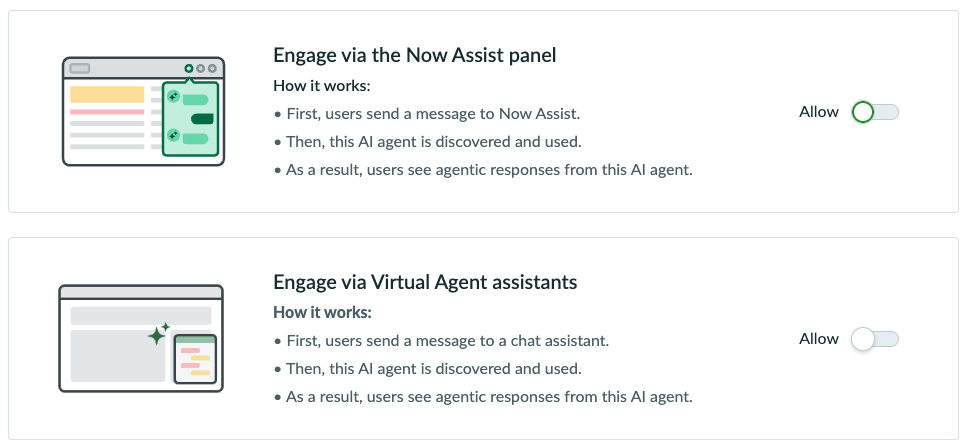
Probably most important is at the bottom, where you toggle whether this agent is active or not. Sometimes this can get flipped to off - validate it’s on before you pull your hair out!

After that, you can save and test! The testing interface, which we won’t cover in this post, is a great way for you to validate what’s working and what’s not. You can chat with the agent, like you would if you were using VA or NAP, you can see a visual process diagram, and most importantly, on the right side, you can see the exact inputs, outputs, and rationale for each tool call. This is the best place to look if you’re troubleshooting.
Common gotchas
Hopefully these few bullets will save you hours that I had to spend figuring this stuff out…
- Make sure your tool names match your list of steps
- Make sure your input names match between your list of steps and tools
- You may sometimes need to explicitly define to ONLY send certain inputs; if you run into issues where the agent is sending errant inputs to your tools and this is causing failures (which you’d know by using the testing interface), try adding a line like “Do NOT send any other inputs than those explicitly defined”
- Subflows and flow actions must be republished after making edits — otherwise, they may silently fail during your agent runs
- Only the user defined in the trigger’s user identity can converse with NAP regarding the agent run (outside of the testing interface)
Good luck!