UI Policies
Last update: August 5, 2025
UI Policies
UI Policies are controls we can set up to adjust fields (or even sections) on a form. We can use conditions to control whether or not a field is visible, editable, or mandatory. UI policies are technically client scripts – meaning they fire on your browser locally (unlike server scripts, which fire when a change is committed to the database). They also technically fire after Client Scripts, and when there’s conflicting logic, the UI Policy wins out. This docs page provides an explanation of the difference.
What’s an example?
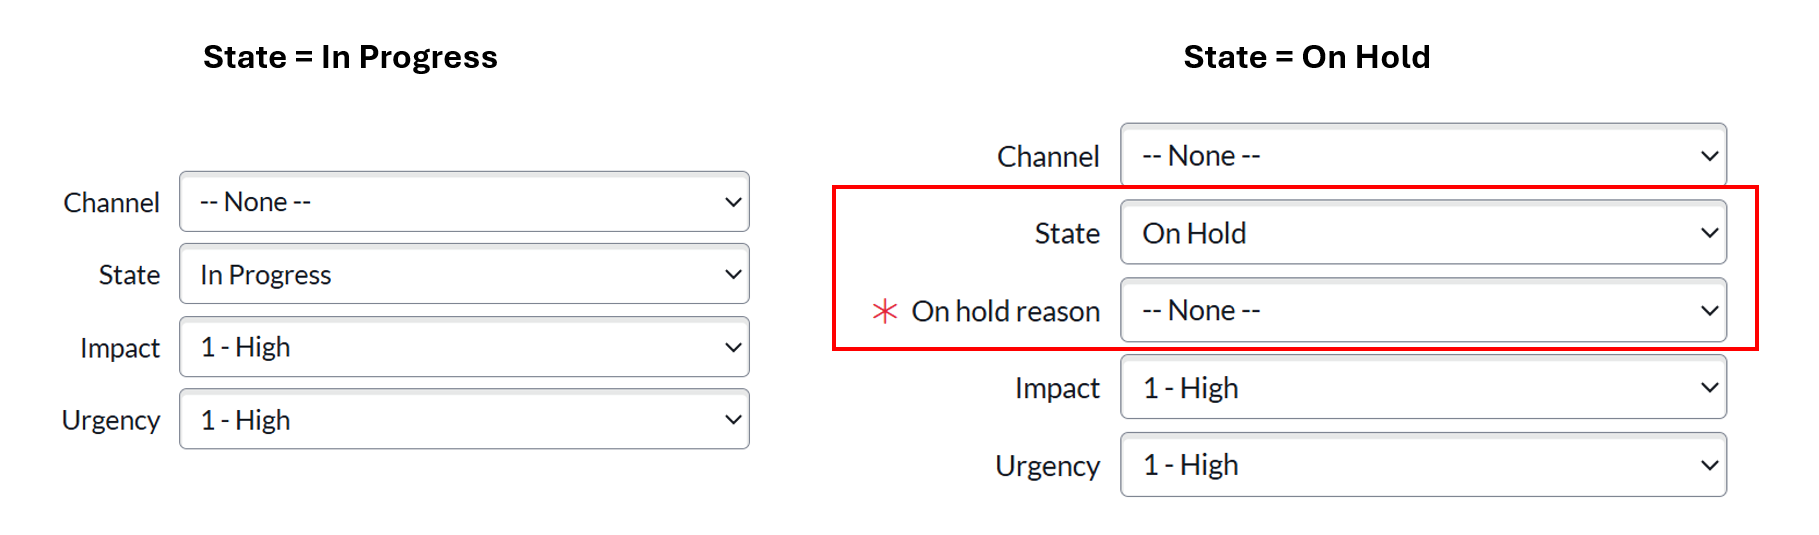
Let’s take an OOTB example on the Incident [incident] table with the State field. When State is On Hold, the On hold reason field becomes visible and mandatory. See the screenshot below:
Another example that may be familiar to you – on some websites, when you select Other from a drop-down, a free-text field appears where you can enter additional details. This, at least in ServiceNow lingo, can be considered a UI Policy.
Breaking down the example
Let’s deep-dive into the example provided above. If we head to the UI Policy [sys_ui_policy] table, we can filter to the Incident [incident] table and then find the record titled When state is On Hold the On hold reason field is visible and mandatory. I’ll note that I’m in the Advanced view (which I selected from the related links).
When to Apply tab
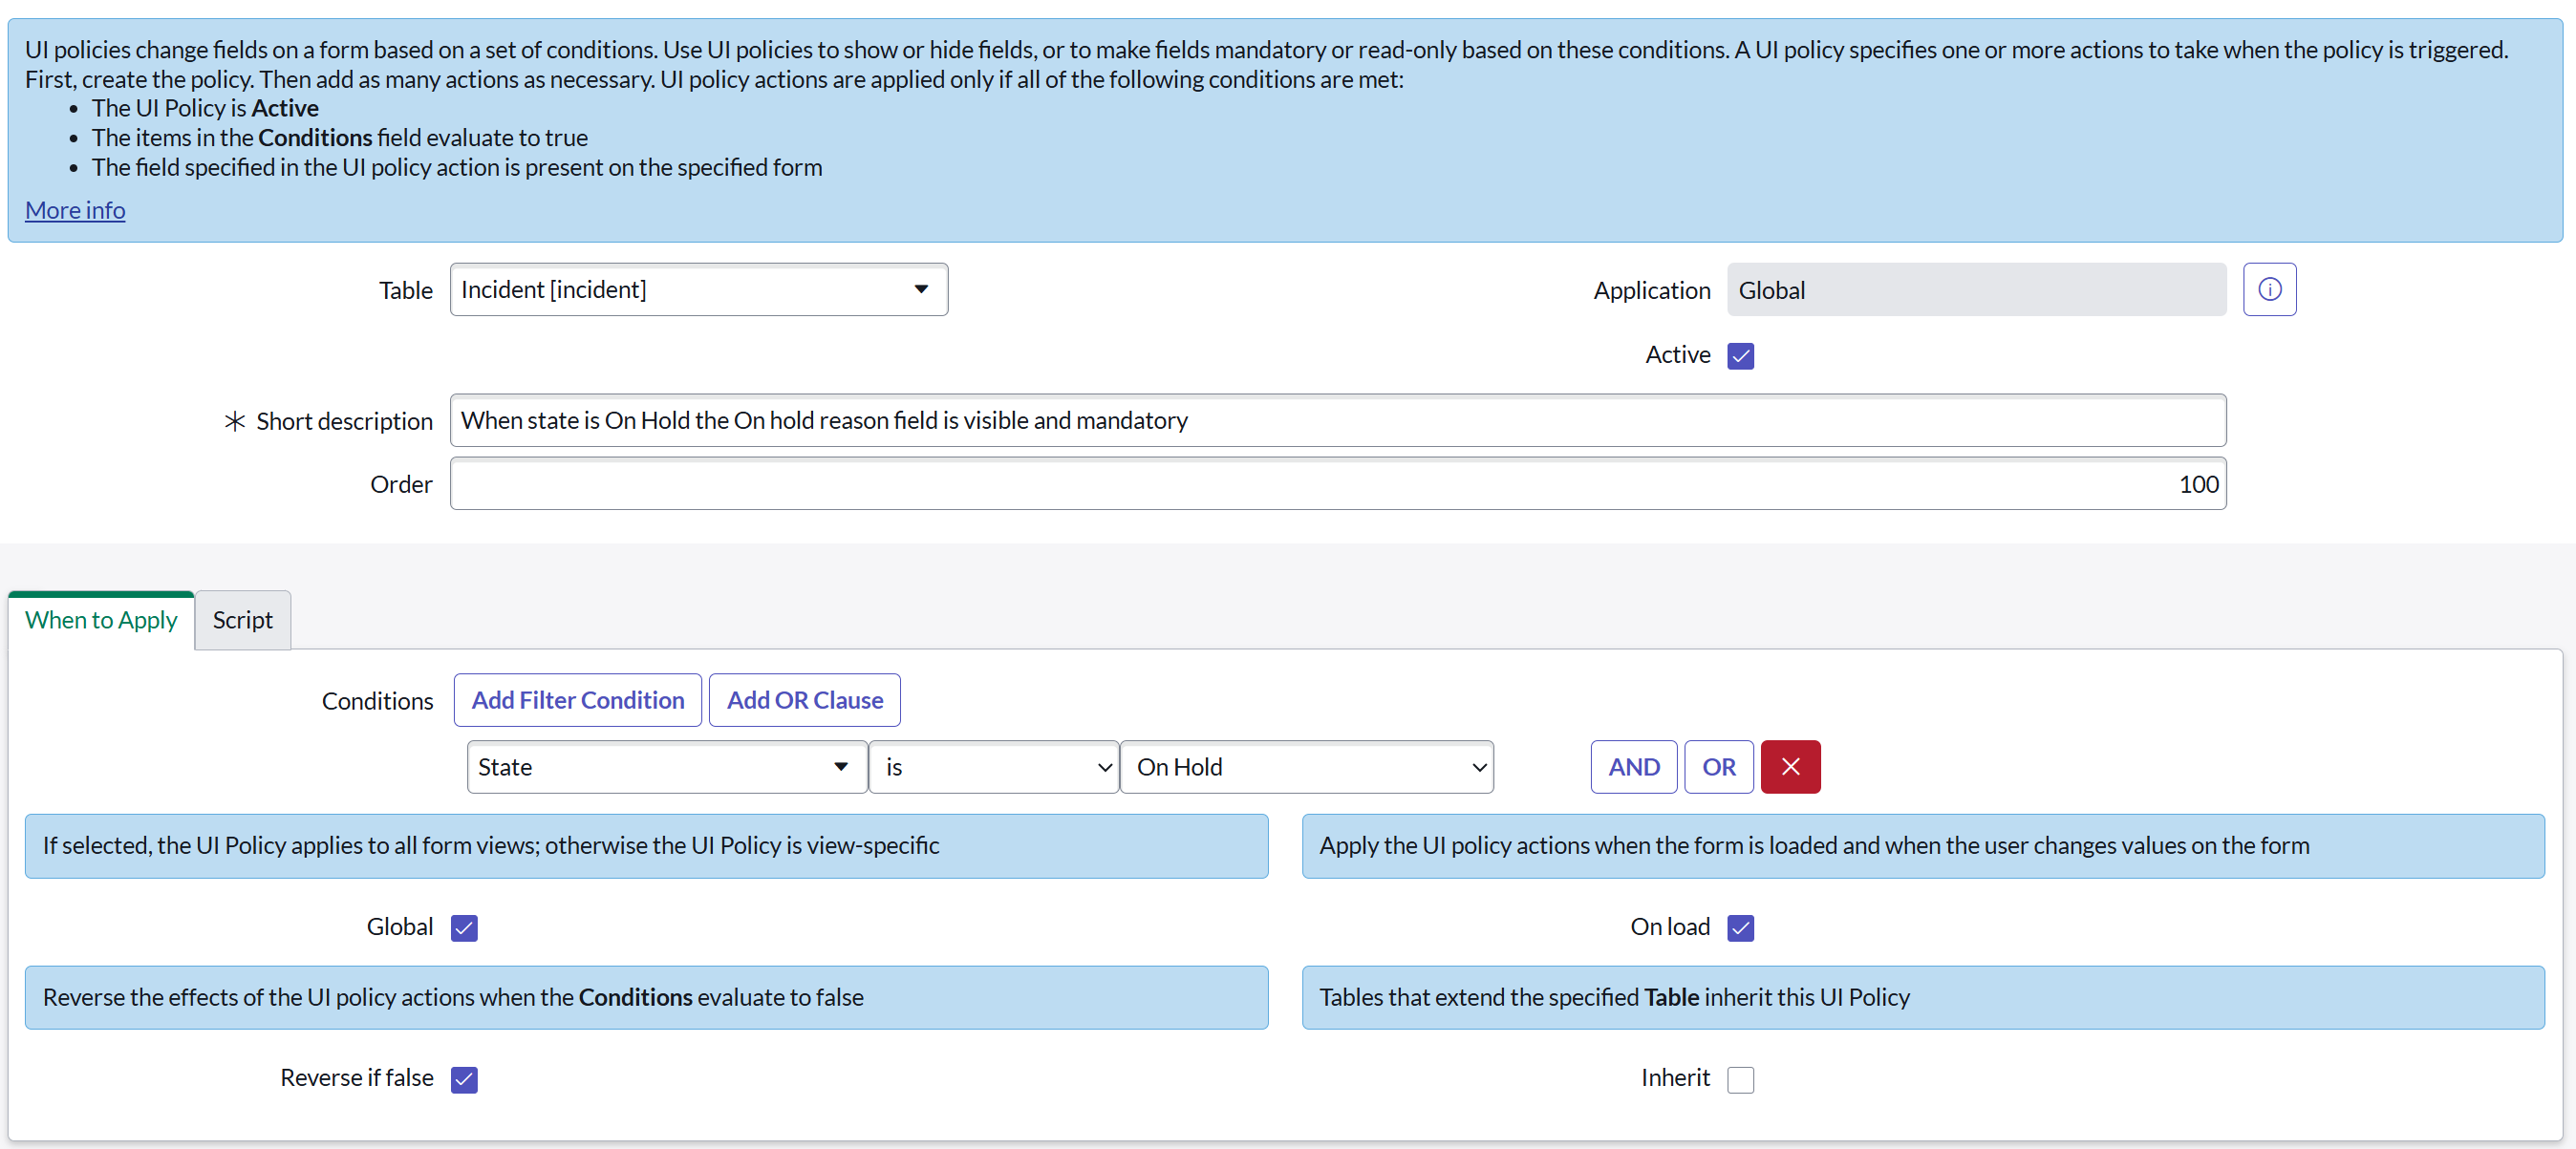
Here, we can see a few settings:
- The Condition that this UI Policy is set up to fire for – when the State is On Hold. Therefore, any time we look at an Incident
[incident]record in that status, we should expect this UI Policy to fire. - The Global checkbox is checked – meaning this will fire for all views. If we uncheck that checkbox, we can specify a specific form view for the UI Policy to apply for. For instance, if we only wanted this UI Policy to fire in the “Self Service” view, we could uncheck Global and choose that view.
- The On load checkbox is checked – so the UI Policy will fire when we load the page, as well as when the form changes. I typically leave this box checked, unless I have a very specific use case. You can read more about when to uncheck this box here.
- The Reverse if false checkbox is checked – so if the State is not On Hold, we’ll undo the effects (which we’ll get to in just a sec)
- The Inherit box is unchecked – because we don’t necessarily need to extend this functionality to child tables
Script tab
In the OOTB UI Policy, we aren’t running scripts. We’re controlling everything with UI Policy Actions (next section of this wiki post). However, if we open the Script tab and check the Run scripts box, we see something that looks like this:

Here, we can specify if we want to run the UI Policy in all UI types – whether that’s Desktop, Mobile/Portal, or both (“All”). We also can script our logic for what we want to happen when the UI Policy condition (State is On Hold is met. Similarly, we’ll script what the default should be in the Execute if false box. We’ll touch on scripting in a little bit.
UI Policy Actions
This is where the (low-code) magic happens. In the UI Policy Actions related list, we can define what we want to happen to a field when the UI Policy condition is met.

If we click into that record, we’ll see…
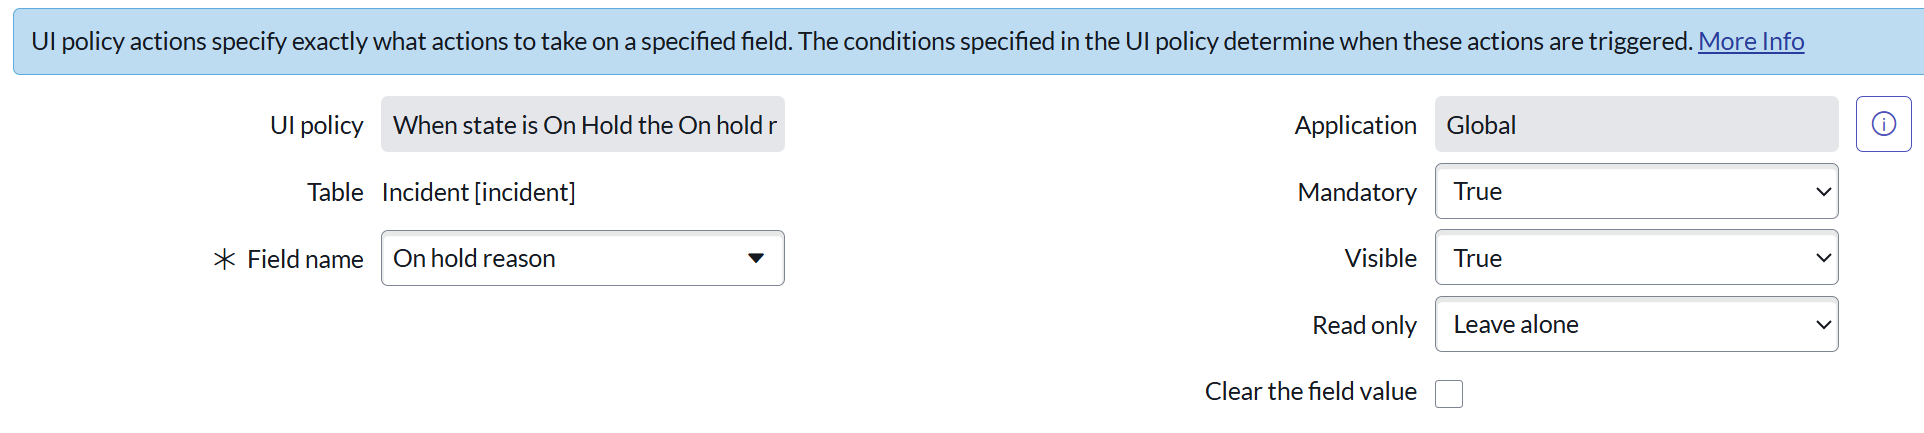
On this page, we select our field of choice – in this case, On hold reason. We then determine what we want to happen to the other attributes of the field: do we want it to be mandatory, do we want it to be visible, do we want it to be read only, and should the field get cleared when the condition is met? I’ll note that mandatory and read-only can conflict with one another, and that dictionary attributes of a field (on the sys_dictionary table) will override UI Policies. In other words, if when you create the field, you set it as mandatory, no UI Policy can override that.
Calling particular attention to the options for the three dropdowns on the right: True, False, Leave alone. These are critical to understand, especially when we have the Reverse if false checkbox checked on the UI Policy record. In this example, when the UI Policy condition is not met, the field is neither visible nor mandatory. The “True” flips to “False.” When you’re setting up UI Policies, make sure to take note of what’s “Leave alone” versus “True” and “False.”
UI Policy Related List Actions
I haven’t really used this. But if you wanted to hide or show a related list depending on a UI Policy, this is where you’d set that up. The setup is pretty simple.
Reverse if false checkbox
This checkbox on the UI Policy record will do exactly what its name implies. It’s like opposite day. In our example above, if the condition is true, the On hold reason field is both visible and mandatory. If the condition is false, that field becomes invisible and optional. (We can’t have an invisible, mandatory field, but that’s besides the point here.) So if you’re setting up UI Policy Actions and you don’t want them to stick when the UI Policy condition is no longer true, make sure that checkbox is checked.
To script or not to script
It’s generally advisable to use the UI Policy Actions rather than scripting. But sometimes you may need to script, if you have a complex condition or need to manipulate the form in a way that a UI Policy Action cannot.
One example of this is hiding an entire section of the form on a condition. Using the code g_form.setSectionDisplay('section_name', false), you can hide an entire section and its fields.
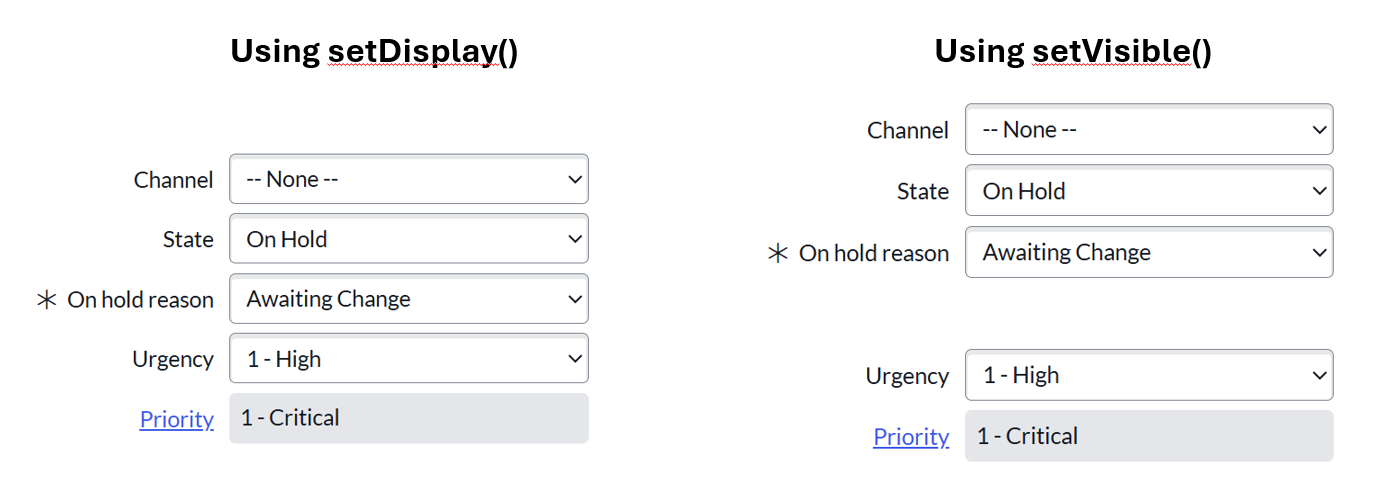
Another example is hiding a field but keeping its “space” on the form. In the screenshot below, the Impact field is invisible. On the left, we “delete” its space, but on the right, we have whitespace where it should be. We can use the setDisplay() and setVisible() methods to achieve these results.
I’ll note that if you decide to script, make sure you populate the Execute if false box with the opposite conditions. So if you set something to false in the True box, make sure you set it to true in the False box. Not confusing at all… right?
My favorite script methods
These are a few of my favorite scripting methods. Most of them are self-explanatory. I’ve added details for a few of them. Remember, you can type these into your code editor in ServiceNow to see exactly what parameters you need! (These all have an implied g_form. prefix.)
setSectionDisplay()getSectionNames()–> use this (either in analert()or aconsole.log()to find out the technical names of your sections, to use the above methodsetReadOnly()setMandatory()setVisible()setDisplay()setLabelOf()addErrorMessage()–> red box at the top of the screenaddInfoMessage()–> blue box at the top of the screenshowFieldMsg()–> displays right at the field; you can customize the color of it